Thursday, June 15, 2006

Quick and Cute Toddler Butterfly Blanket


This travel sized, toddler "comfort" blanket works up quick and soft using a P hook and double yarn strand.

Materials needed to make blanket as shown:
P hook
For Body:
1 skein of TLC Lustre in white, divide into two balls.
For Wings:
3 skeins of Caron Wintuk yarn. (Divide last skein into two balls so you can work with two strands) You can substitute any worsted weight yarn of your choice. Finished measurements will vary depending on yarn used.

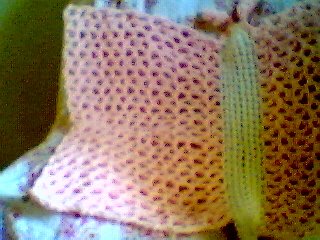
Blanket size as shown:
Body length: without optional antennae: 17"
Wing height: 24"
Wing width (widest point) 26"
Center wing width: 24"

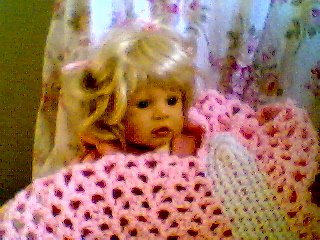
The doll shown holding the blanket below is 22" tall.

Rnd 1. With P hook and two strands of body color yarn held together, ch 31. Sc in second ch from hook. Sc in each sc to end of row, 29scs. In sc at end of row, (30th ch) work 3 scs. Work sc in each free loop of chains back up the opposite side of starting chain. 3 sc in last ch at end.

Rnd 2. Sc in each sc of previous row up to the end. Work 3 scs in last sc of row. Work sc up opposite side, 3 sc's in last sc of row.

Rnd 3. Continue with pattern of sc's up side of body in this manner, now adding 2 scs to each of the last 3 sc's at the end of the body. Work sc's back up opposite side of body, putting 2 sc's in each of last 3scs at opposite end as well. Continue until body is the size you desire; for a snuggle size travel blankie, I end here and finish off the body.

For Wings:

Row 1, Approximately 6 st's from top of head (eyeball to determine where you want to start your wings) Join 2 strands of contrasting color of your choice. Ch 5, then dc in same st: this forms your first V stitch. *Sk next sc, work V st (dc, ch 2, dc) in next sc*. Repeat from * to * leaving last 6 or so sc's of row unworked. Ch 5, turn. (15 v sts)

Rows 2-4: Dc in same st to form first V st of next row. Work V st in each V st across, ch 5, turn.

Rows 5-10: Dc in same st to form first V st of row. Work V st in next 6 V sts. Sc in next V st; work V st in last 7 V sts. Ch 5, turn. (14 V sts, 1 sc)

Row 11: Dc in same st to form first V st. Work V st in next 6 V sts; sl st in center sc: Work V st in remaining V sts. (14 V sts, 1 sl st)

Row 12: Dc in same st to form first V st. Work V st in each V st, sl st in center sl st. (14 V sts, 1 sl st.)

Repeat row 12 until your wing is desired width. (For a travel sized blankie, I like to make each wing 12 rows). At end of last row, finish off.
Starting at opposite end of body (with right side still facing), duplicate wing pattern on opposite side of body to make second wing.

Embellish as you like, with crocheted antennae, embroidered eyes (Take care NOT to use buttons or trims that may pose a serious choking hazard!) You can use any variation of colors and yarns that you like to personalize the butterfly for the child who is to receive it.

Pattern can be enlarged to any size you wish by continuing rows of body and wings until you achieve the desired size. Also, if you're making the pattern for an older girl, you can use a smaller sized hook and single skein of yarn to make a lighter weight afghan with finer detail, though doing so makes the pattern a lot more labor intensive.
I have gotten lots of email asking if this is a suitable baby shower gift, I would have to say that as it's written it's not intended as a baby blanket. You would need to modify the pattern using a smaller hook/more rows if you're planning to make this as a baby gift, so the holes won't catch little newborn fingers and toes in them. I hope to work on a more 'baby friendly' version of this cuddle blanket in the very near future.
Copywrite Ro (C. C.) March 2005, revised November 3, 2005.

This pattern may not be reproduced in any manner, sold, or used to create items for sale for any reason. You may link back to this
site only. This pattern may be used to create items for personal use or for charity donations, but not for charity fundraising. If you would like to make paper print outs for your charity group, please write to me for permission in advance. Thank you!
If you have any questions about the proper use of this pattern, please contact me.

The Princess Sarina Tiara Beanie


The Princess Sarina Tiara Beanie
by:Ro (C.C.)

This hat is worked in rounds, using a variety of crochet hook sizes and
front/back loop only rounds, please read the directions carefully as you go!

Made using worsted weight yarn (Red Heart TLC in this case) Caron

Simply Soft can be substituted but the thinner the yarn, the smaller the hat size will turn out.

This hat should fit a 5-8 year old girl.

To make hat:
Rnd 1. Using an I hook, chain 4, join with sl st. Work 11 dc into the ring,
join.
*Note* Rounds 2-8 are all worked in front loops only.
Rnd 2. Chain 3, dc in same st. work 2 dc in each st around in FRONT LOOPS ONLY, join with sl st.
Rnd 3. Chain 3, dc in same st. *1 dc in next st, 2 dc in following st. *
repeat from * around, join.
Rnd 4. Chain 3, dc in same st. *1 dc in next 2 sts, 2 dc in following st.*
repeat around, join with sl st.
Rnd 5. Chain 3, dc in same st. * 1 dc in next 3 sts, 2 dc in following st. *
repeat around, join with sl st.
Rnd 6. Chain 3, dc in same st. * 1 dc in next 4 sts, 2 dc in following st. *
repeat around, join with sl. st.
Rnd 7. Chain 3, dc in same st. Work 1 dc into each st around, (still working in F.L.O. as in above rounds 2-6). Join with sl. st.
Rnd 8. Repeat Rnd 7
Rnd 9. Chain 2, dc in same st. *1 dc in next 3 sts in BACK LOOP ONLY,
decrease. * Repeat around, join with sl st.
Rnd 10. Chain 2, dc in same st. * 1 dc in next 4 sts, in B.L.O. still.
Decrease. * Repeat around, join with sl st.
Rnd 11. Chain 3, dc in same st. dc in each st around, still in B.L.O. join.
Rnd 12. Repeat rnd 11.
Rnd 13. Chain 1, sc in each st around in F.L.O. join with sl st, finish off,
weave in ends. (To make a smaller hat: skip round number 8 and round number 12.)

To make tiara:
Pick a contrasting yarn, such as white, or even gold or silver yarn to make the tiara portion of this hat.

With an F hook:
Row 1. Chain 81. turn.
Row 2. Sc in second st from hook, continue all the way across the row (80 sc) chain 1, turn.
Row 3. Sc in each st across. (80 sc) ch 1, turn.
Row 4. Sc in next 23 sts. sc five times in next st , sc in next 5 sts.
Switch to a G hook, ch 2, hdc 4 times in next st. Ch 2, sl st to same st as
4 hdc's.
Back to F hook, sc in next 5 sts. Switch to H hook, ch 2, hdc 4 times in
next st. Ch 2, sl st to same st the hdc's are in.
Back to F hook, sc in next 5 sts. Switch to I hook, chain 3, dc 4 times in
next st. Chain 3, sl st in same st as 4 dc's.
Back to F hook, sc in next 5 sts. Switch to H hook, ch 2, hdc 4 times in
next st. Ch 2, sl st to same st the hdc's are in.
With F hook, sc in next 5 sts. Back to G hook, ch 2, hdc 4 times in next st. Ch 2, sl st to same st as 4 hdc's.
With F hook, sc in next 5 sts. sc 5 times in next st, sc in remaining sts to
the end of the row. Finish off, weave in ends.
With yarn and a yarn needle, sew tiara to top of beanie, joining the chain loops at the bottom of the tiara to the loops of the 5th seam down from the top of hat. Be sure that your whipstitch is only through these loops on the outside so there is no seam inside the hat to irritate skin. Once the tiara is secure, finish off, weave in ends.

"Jewels" may be made on tiara by sewing little circles of colored yarn on as decoration if desired.

Copywrite Ro C. 2003

This pattern may be used and distributed only to make hats for charity or gifts. For any other use, contact me for permission sherwoodro at sbc global dot net. Please do not reproduce this pattern or copy on other websites, linking is happily allowed :)

Ro's Ruffles


Ro's Ruffles
By Ro C. 2002


This pattern was made with Bernat sport weight baby coordinates yarn. Should be made with softest, lightest yarn possible if being used as a chemo cap.

Using an H hook: (Rounds 2-5 worked in back loops only, after that read each round’s instructions to know which loop to work in.)
Round 1: Chain 4, join. 12 dc’s in the ring, join.
Round 2: Chain 3, 2 dc’s in each st around, join.
Round 3: Chain 3, dc in same st, *1 dc in next st, 2 dc in next st* repeat from * around, join.
Round 4: Chain 3, dc in same st. *1 dc in next 2 sts, 2 dc in next st * around, join.
Round 5: Chain 3, dc in same st. *1 dc in next 3 sts, 2 dc in next st. * around, join with 2 sl sts, TURN HAT.
Round 6: Chain 1. sc in each st around, join with sl st. TURN HAT back to original position.
Round 7: Chain 3, dc in same st, dc in each st around (in back loop) join.
Rounds 8-11: Chain 3, dc in same st, dc in each st around (in front loop only!)
At end of row 11, join with sl st in next two sts, TURN HAT.
Round 12: Chain 1, sc in each st (in back loop) around, join.
Round 13: Chain 1, *sc in next 2 sts, then work 5 dc’s in next st (back loops only!)to form ruffle* repeat from * around, join.
Round 14: work 5 dc’s in one sc from previous round, (skip second sc) then sc in third st of next ruffle. Repeat around to make second row of ruffles on brim. Join, finish off, weave in ends.
Hat may be trimmed with crocheted flower, secured TIGHTLY so the kids cannot pull them off! Use care!
Hat can be worn with brim worn down, or turned upward.
This pattern may be used and distributed only to make hats for charity or gifts. For any other use, contact me for permission. Please do not reproduce this pattern or copy on other websites, linking is happily allowed :)

Little Flower Hat


Little Flower


By Ro C. 2002

Worked with I hook and soft, sport weight yarn. Pink or other pastel color for hat, green for brim and trim.

Round 1: Chain 4, join. Work 12 dc into ring, join.

Round 2: Chain 3, dc in same st. * 2 dc in each st around, join *

Round 3: Chain 3, dc in same st. * dc in next st, 2 dc in next st * around, join.

Round 4: Chain 1, sc in same st, *sc each st around *, join.

Round 5: Chain 3, dc in same st, * dc in each st around * join

Round 6: Chain 3, dc in same st, * dc in next 2 sts, 2 dc in next st * around, join

Round 7: Chain 1, sc in same st, * sc in each st * around, join.

Round 8: Chain 3, dc in same st. * dc in next 3 sts, 2 dc in next st* repeat around, join

Round 9: repeat row 7

Round 10: Chain 3, dc in same st. dc in each st around, join.

Round 11: Chain 1, sc in same st, sc in each st around, join.

Round 12: Chain 3, dc in each st around, join with sl st. TURN

Round 13: (With H hook) Chain 1, sc in each st, front loops only, join, finish off.

JOIN GREEN YARN FOR “LEAFY” BRIM:

Round 14: sl st 2 times, TURN. Chain 3, dc in each st around in back loop only, join.

Round 15: Chain 3, dc in each st around in front loops only, join.

Round 16: chain 1, sc in each st around, join.

Round 17: sc in first 2 sts, *work 5 dc in next st, sc next 2 sts, * repeat around, join. Finish with 2 sl sts, weave in ends.

TRIM: (H hook) Turn hat so that it is right side facing. Join green yarn to unworked front loop of round 13 (start by the seam in the back) chain 1, * reverse sc in next st, work 5 dc’s in next loop, reverse sc in next*. Repeat around, join. Finish off, weave in ends.

BAND: With 2 strands of pink (or whichever color used for top of hat) held together, make chain approx. 30 inches long. Tie ends off.
Weave the chain through the dc’s of row 15, ending up with the ends to one side.

Pull to desired size of girl’s head, then tie extra into a bow. Double knot the bow so it can’t be undone by child, or, loop loose ends into circles and sew down onto hat to make a flower shape. (as shown in picture).

Variation on this pattern: Finish off hat at round 17, and instead of continuing with pattern, turn hat inside out and flip up the brim, as shown below.

Copywrite Ro C. 2-05-05

This pattern may be used and distributed only to make hats for charity or gifts. For any other use, contact me for permission. Please do not reproduce this pattern or copy on other websites, linking is happily allowed :)

Kitty Cap 1-3


The Kitty Cap
There are three variations of this pattern. The original, which I came up with back in 2002 and two variants that I just fine tuned. The original hat and second version are smaller, with the 2005 update being the largest of the three hats. The hat shown below should fit a baby whose head measures approximately 16 inches.

Kitty
Designed by: Ro C.
Using an I hook, this hat is made with worsted weight Red Heart TLC yarn.
It can be made with a smaller hook/thinner yarn to create a smaller hat.
Round 1: Chain 4, join. 11 dc in ring, join.
Rounds 2-4 :Chain 3, dc in same st, * 2 dc in each st around (in back loops only) *, join
Round 5: Chain 3, dc in each st around (in back loops only), join. Sl st in next st, TURN
Round 6: Chain 1, sc in each st around (front loop only!), join, TURN
Round 7: Chain 3, *dc in next 2 sts (front loops only!) then decrease, * repeat from * around and join.
Round 8: Chain 3, dc in eact st around, (front loops only!), join.
Round 9: Chain 2, dc in next three sts, (front loops only!) then decrease. Repeat around, join.
Rounds 10-15: sc in each st around, join. After round 15, finish off and weave in ends.
(If tighter band is desired, an H hook can be used for rows 10-15.)

~~~~~~~~~~~~~~~~~~~~~~~~~
Kitty Cap 2
(variant)
Ro C.
2005


<>
This pattern may be used and distributed only to make hats for charity or gifts. For any other use, contact me for permission. Please do not reproduce this pattern or copy on other websites, linking is happily allowed :)
~~~~~~~~~~~~~~~~~~~~~~~~~~~~~
Kitty Cap 3
By Ro C.
Designed 2002
Revised (to make hat larger) in 2005.
This version of the hat is shown on a hat model the size of a
full grown female head.


Using an I hook, this hat is made with worsted weight Red Heart TLC yarn. It can be made with a smaller hook/thinner yarn to create a smaller hat.

Round 1: Chain 4, join. 11 dc in ring, join.

Rounds 2 and 3 :Chain 3, dc in same st, * 2 dc in each st around (in back loops only) * join.

Round 4: Chain 3, dc in each st around (in back loops only), join. Sl st in next st,

Round 5: Ch 3, dc in same st. 2 dc in each st around (back loops only) join.

Round 6: Ch 3. Dc in each st around, join.

Round 7: Chain 1, TURN sc in each st around (front loop only!), join.

Round 8: Chain 3, TURN *dc in next 2 sts (front loops only!) then decrease, * repeat from * around and join.

Round 9: Chain 3, dc in eact st around, (front loops only!), join.

Round 10: Chain 2, dc in next three sts, (front loops only!) then decrease. Repeat around, join.

Rounds 11: Ch 3, dc in each st around, join.

Rounds 12-15: sc in each st around, join. After round 15, finish off and weave in ends.

Round 16: ch 1, turn. Sc in each st around, join. Finish off, weave in ends.
(If tighter band is desired, an H hook can be used for rows 10-16.)
Copywrite Ro C. 2-05-05

This pattern may be used and distributed only to make hats for charity or gifts. For any other use, contact me for permission. Please do not reproduce this pattern or copy on other websites, linking is happily allowed :)

Beautiful Girl Micro Preemie Hat


Beautiful Girl Micropreemie Hat by Ro C.

Materials Needed:
Lion Brand Microspun Yarn in blue or your choice of color
Size E Crochet hook
Yarn needle
Stitch Marker

Rnd 1. Ch 6, join. Ch 1, 8 scs in ring, join.
Be sure to use a stitch marker to know where to end your rounds.

Round 2, Ch 1, 2 sc in each st around. Join.

Round 3: Ch 1. sc in each st around, join

Rounds 4-8, repeat round 3. At end of round 8, ch 2, turn.

Round 9. hdc in each st around, join. Ch 3, turn.

Round 10. 2 dc in same st. 3 dc in each remaining st around, join. Finish off, weave in ends. Trim if desired.
©Ro C. 4-17-05

This pattern may be used and distributed only to make hats for charity or gifts. For any other use, contact me for permission. Please do not reproduce this pattern or copy on other websites, linking is happily allowed.)


Little Boys Micro Preemie Hat


I have received requests for patterns for hats small enough to fit premature infants with heads the size of a golf ball.

Sadly, we know that babies born this small just cannot survive, but that doesn't stop me from honoring their lives and families by designing hats for them to wear when they are presented to their parents. The name of the bonnet signifies how a parent loves their baby from the moment they find out that it's expected, long before it is born.

I will soon be making a small crocheted model for these and taking new pictures, until then, please bear with the photos on the patterns.

Materials Needed:
Lion Brand Microspun Yarn in blue or your choice of color
Size E Crochet hook
Yarn needle
Stitch Marker

Rnd 1. Ch 6, join. Ch 1, 8 scs in ring, join.
Be sure to use a stitch marker to know where to end your rounds.

Round 2, Ch 1, 2 sc in each st around. Join.

Round 3: Ch 1. sc in each st around, join

Rounds 4-8, repeat round 3.

Round 9. Ch 1 turn sc in each st around join

Round 10. Ch 2 hdc in each st around join

Round 11. Repeat round 5

Finish off, weave in ends. Turn rows 9 through 11 up for brim.

©Ro C. 4-17-05

This pattern may be used and distributed only to make hats for charity or gifts. For any other use, contact me for permission. Please do not reproduce this pattern or copy on other websites, linking is happily allowed.)

Micro Preemie Bonnet Pattern


"I loved you from the first" Micro Preemie Bonnet Pattern

I have been told that requests have been made for hats small enough to fit premature infants with heads the size of a golf ball. Sadly, we know that babies born this small just cannot survive, but that doesn't stop me from honoring their lives and families by designing hats for them to wear when they are presented to their parents. The name of the bonnet signifies how a parent loves their baby from the moment they find out that it's expected, long before it is born.
I will soon be making a small crocheted model for these and taking new pictures, until then, please bear with the photos on the patterns.
Materials Needed:
Lion Brand Microspun Yarn in white or your choice of color
Size E Crochet hook
Yarn needle
Stitch Marker
Small amount of ribbon
Rnd 1. Ch 3. sc 6 times in third ch from hook, join. Mark end of round with stitch marker.
Rnd 2. 2 sc in each st around; 12 sc total.
Rnd 3. 2 sc in each st around, do not join. 24 sc total.
Rnd 4. sc in each st around, do not join. 24 sc total.
This is where you stop working in complete rounds to construct the rest of the hat, please follow directions carefully.
Row 5. sc in next 17 sts, sl st in 18th sc. Ch 2, turn.
Row 6. Dc in next 18 sts. Ch 3, turn.
Row 7. Dc in next 18 sts. Ch 1, turn.
Row 8. Work 2 sc in each of next 18 dcs across brim of bonnet. Finish off, weave in ends.
To make chin tie, loop ribbon through loop at ends of row 6. Tie in bow. If desired you can add sewn on beading, bows, or flowers.
Note: To make a slightly larger bonnet as shown below on model of a baby approximately 16 weeks gestation*, you can add another round of scs between rows 4 and 5 and another row of dc between rows 7 and 8. Then finish by working sc across row 8, then continue to trim by working 2 sc in each dc on the side of the hat, one sc in each sc of bottom of bonnet, two sc in each dc on opposite side of hat, then finish off and weave in ends.


This pattern may be used and distributed only to make hats for charity or gifts. For any other use, contact me for permission. Please do not reproduce this pattern or copy on other websites, linking is happily allowed.)
©Ro C. 4-17-05
*Thank you to Sandy Eding, the incredible artist who made me this beautiful preemie doll in memory of the babies that I lost. I will treasure her always, Sandy, thank you

Little Darling Preemie Hat


Little Darling Preemie Hat By Ro C.

You can see the difference in size between the "Littlest Angels" hat and the Little Darling. Even though the patterns are very similiar, the Little Darling was made using Bernat Cotton Tots yarn, making it warmer and thicker than the previous hat for preemies still in the NICU. The hat pictured measures 9/12 inches around and 3 inches in height.

RND 1: Ch 3, join with sl st to form ring. 6 dc in the ring, join with sl st to first dc.

RND 2: Ch 3, dc in same st. 2 dc in each dc around, join with sl st to first dc.

RND 3: Ch 3, dc in same st. *Dc in next st, 2 dc in next st* continue from * around, join with sl st to ch 3.

RND 4: Ch 1, sc in each st around, join with sl st to first ch.

RND 5: Ch 3, dc in same st. *Dc in next 3 sts, 2 dc in next st* repeat from * around, join with sl st to ch 3.

RND 6: Ch 1, sc in each st around, join with sl st to ch 1.

RND 7: Ch 3, dc in each st around, join with sl st to ch 3.

RND 8: Ch 1, turn. Sc in each st around, join with sl st to ch 1.

RND 9: Ch 1, sc in each st around, join with sl st to ch 1. Finish off and trim as desired. May be left plain for boys, or last two rows can be worked in a different color yarn to trim the boys hat.

Copywrite Ro C. 2-05-05

This pattern may be used and distributed only to make hats for charity or gifts. For any other use, contact me to request permission. Please do not reproduce this pattern or copy on other websites, linking is happily allowed :)

Littlest Angels Micro Preemie Hat


Littlest Angels Hat by Ro C.
Needed for project:
Size F Crochet Hook
Microfiber or extremely fine baby yarn
Yarn needle
Scissors

My sentiment and inspiration in creating this tiny, almost doll-sized hat is that every preemie, even those too small to survive, should be presented to their parents wearing a handmade gift of love. I believe this with all my heart, and I hope that others will be able to make these hats too to donate to NICU's everywhere.
These can also serve as keepsakes for the parents.

(Micro-preemie hat will vary in size depending on the yarn used. The hat pictured above was made with TLC baby and measures 6 inches around and 2 1/4 inches high.)

RND 1. Ch 3, join with sl st to form ring. 6 dc in ring, join with sl st to first dc.

RND 2: ch 3. Dc in same st. *Dc in next st, 2 dc in next st* repeat from * around, join with sl st in ch 3.

RND 3: Ch 1, sc in each st around, join with sl st to ch 1.

RND 4&5: Ch 3, dc in each st around, join with sl st to ch 3.

RND 6: ch 1, turn. Sc in each st around, join with sl st to ch 1.

Finish off and trim as desired with rosettes, beading, or lace.
Copywrite Ro C. 2-05-05
This pattern may be used and distributed only to make hats for charity or gifts. For any other use, contact me for permission. Please do not reproduce this pattern or copy on other websites, linking is happily allowed :)

Micro Preemie Hat 1 Pattern


Micro-Preemie hats by Ro

To honor the tiniest of preemies, I created this hat using microfiber yarn and a size F crochet hook. Dimensions of this hat are 9 inches around and 4 inches high including brim.
Needed for project:

Size F Crochet Hook

Microfiber yarn in two contrasting colors

Yarn needle

Scissors


------------------------------------------------------------------------


RND 1. ch 4, join with sl st. to form ring. 8 dc in ring, join with sl st.


RND2. ch 3, dc in same st. 2 dc in each st. around. Join with sl st. to first dc.


RND 3. ch 3, dc in same st. *Dc in next dc, 2 dc in next dc* Repeat from * to * around Join with sl. st to first chain 3.


RND 4. ch 3, dc in same st. *Dc in next 2 dcs, 2 dc in next dc* repeat from * to * around. Join with sl st. to first ch 3..


RND 5. ch 3, dc in each st around, join.


RND 6. ch 1, sc in each st. around, join


RND. 7. ch 3, dc in each st. around, join.


RNDS 8 and 9. ch 1, sc in each st around, join.


RND 10 ch 1, turn.. Sc in back loops only around. join. Finish off.


Brim:


RND 1: Join contrasting color with sl. st in sc at back seam of hat. Sc (in unworked loops left from crocheting previous round in back loops only) around; join.


RND 2: ch 3. 2 dc in each st around, join.


RND 3: ch 1, sc in each st around, join. Finish off. Trim as desired (I made a little rosette)


Copywrite Ro C. 2-05-05 This pattern may be used and distributed only to make hats for charity or gifts. For any other use, contact me for permission. Please do not reproduce this pattern or copy on other websites, linking is happily allowed :)

Welcome to the new home of One Small Thing

Hi, My name is Ro and I have for almost a year now, run a website called One Small Thing.org. Before that I ran a little group called Project Sherwood Forest, and have published several crochet patterns on the web on these websites.

Due to the ever-rising cost of, well, everything, I am letting the domain name and website hosting service go in favor of posting things to Blogger. It won't be as glamorous as it has been, but this is what the times demand. Simplicity and downsizing.

Hopefully this will still allow people to find my patterns (and contact me if they have questions) and will allow me to undertake charity projects as I am inspired to do so.

I will start by posting the patterns and go from there, please be patient as it will take me some time to build up this blog to do as much as possible of the work that the old host did.

Be well and keep crocheting!
Ro